Showing posts with label Family Time. Show all posts

Friday, January 3, 2014

Change is coming in my 2014

Well Hello There Friends! 
It's been a while since I was on here. Welcome to a New Year! I hope your holidays treated you well. Ours was fun and exhausting, full of friends and family and yummy treats. And gifts....! 

So.... 2014

Here we are a couple days in to the new year. Do you create resolutions or goals with the new year? Some say, 'bleh!', to making goals with the new year. I love it! I need it. I am always revisiting it, adding to it, marking things off and rolling things over to my new Goals list. I think it is good and healthy to think back on what you can improve on and to look forward to what you would like to do and learn and invest energy into. And, I like to pick a word for the title of my New Year's Goals. This year's word: 

Change

First change that came for my new year: we turned off our Dish service and are going back to bunny ears. That change came two days early! Why? Well, looking back over the past year, I realized God was talking to me through different avenues telling me that it was becoming too important in my life. I realized I had become addicted. I loved my television time. I have my favorite shows and would even watch reruns over and over again, wasting precious time and getting angry if my T.V. time was interrupted. My addiction was effecting our family life negatively. 


Second change to work on this year came to me after I read a post at Hands Free Mama. In her post, About Hands Free, Rachel writes, 

"Finally after years and years of over-commitment and meaningless information overload, I began to see those things for what they were: Daily Distractions. And with much regret, I realized I’d been holding on to “distractions” tighter than I had been to my own family, my own health, my own happiness–my own “things that matter.”

After reading this post and others on her site, I broke down in tears. God was speaking to my heart. I needed to hear this. I had to take a hard, close look at my daily life and swallow that I am not allowing much time for God or what He desires to be important in my life. And no matter how hard it was to read it and admit it [to myself and others], I needed to make some big changes in my life and choices. Thank God for people like Rachel to share these things and Thank God for his perfect timing!


So.... 2014 for me is Change!


Change how I spend my time. Change who I spend my time with. Allow Change to happen naturally and gracefully. Change.....

What is this New Year for you? What is your word for the year? Let God speak to you and stop long enough to truly hear what He is saying. 


Matthew 6: 19-21
19 “Do not store up for yourselves treasures on earth, where moths and vermin destroy, and where thieves break in and steal. 20 But store up for yourselves treasures in heaven, where moths and vermin do not destroy, and where thieves do not break in and steal. 21 For where your treasure is, there your heart will be also."


Sunday, December 1, 2013

30 Days of D.I.Y. Gifts and Decor: All Wrapped Up!


Well Friends, this is the last post in my 30 Days of D.I.Y. Gifts and Decor. Yes, it is a day late but when family is in town and last minute trips to the beach are planned, those are more important (in my opinion) than whether or not a post is on time. Because family time matters! We all will be spending more time [hopefully] with family and friends this holiday season. Give them hugs and kisses, tell them you love and appreciate them because you never know when God will call you or them home! And, if you are giving gifts to your loved ones too, as my last post, I wanted to share some of the creative ways I have found online through blogs and Pinterest to wrap them up. I sincerely hope that the last thirty days have encouraged you to be creative this holiday season both in your decor and gift giving! 
From me to you all ~ Happy Crafting!


All Wrapped Up!


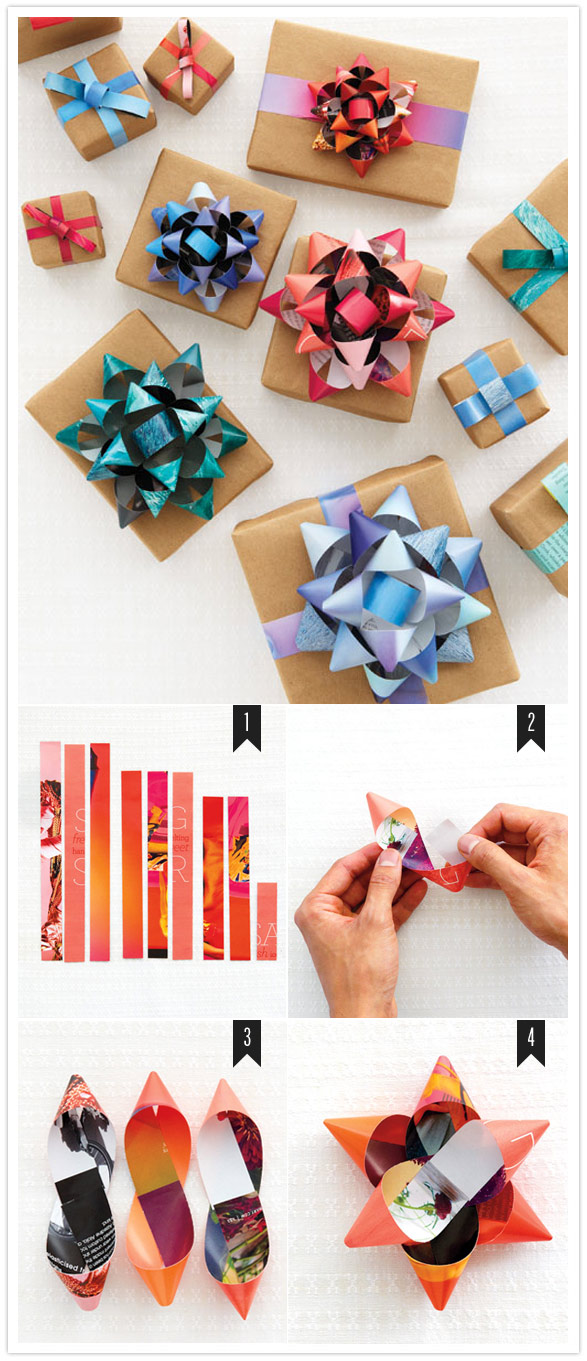
How to make a modular bow from UsefulDIY. This looks so simple it makes me shake my head and wonder how I never figured this out on my own before. ; ] You have to stop by and check them out!

A simple and quick wrap idea for a last minute gift ~ wrap up a candy bar. Check them out at The Frugal Girls 


Rebecca at Older and Wiser has a TON of awesome ideas for wrapping including this beautiful one from her Dollar Store Wrapping post!
Love this wrapping idea for the fashionista in your life. Wrap with a shirt and pin for a bow! Check out this and other wrapping ideas at Kollabora.
How to make a bow from anything at the blog 100 Layer Cake. Another great use for all those extra magazines I have lying around....
My favorite wrap idea from the list at Urban Farmgirl ~ old t-shirt ribbons.

If you are a paper-crafter, here are some super cute options from the blog, Stamped - Bettina and Mary.


Wednesday, November 20, 2013

30 Days of D.I.Y. Gifts and Decor: A 'Thankful' Tree

Welcome to Day 20 of 


Hi All! I have switched my focus onto the up-coming holidays that will be filled with family and friends, love and laughter, giving and receiving! For me, some of the best memories and gifts have been what is handmade and from the heart. And, I love giving and receiving handmade and locally crafted gifts. So, I am going to share a new project every day for the month of November to get y'all (and myself) into the spirit of the holidays! I hope you enjoy the next thirty days with me! I would love to hear if you try any of the projects and how they turned out. <3 Erika


A 'Thankful' Tree from Better Homes & Gardens


A friend of mine did a (better) version of this at a dinner we had together and I have to tell you, there is something so powerful in writing down what you are thankful for. Not just thinking about it but writing it down and then having it read out loud. It hits home more; sinks in more that, yeah, I really do have so much to be grateful for. And, what is even more lovely about this project is that it gets to whole family involved from the youngest to the oldest. What a great example to set for the littlest ones by having them participate along side the adults! To make it an even more lovely center piece to your Thanksgiving holiday, you could spray paint the branch(es) with chrome or glitter paint in fall colors!


Check out the full post for the Thankful tree at Better Homes and Gardens.
Or, you can find in on my Pinterest Board: Falling for Autumn


Tomorrow: Gifts for the Gardener


Sunday, November 17, 2013

30 Days of D.I.Y. Gifts & Decor: Homemade Advent Calendars

Welcome to the weekend of the 16th & 17th of 


Hi All! I have switched my focus onto the up-coming holidays that will be filled with family and friends, love and laughter, giving and receiving! For me, some of the best memories and gifts have been what is handmade and from the heart. And, I love giving and receiving handmade and locally crafted gifts. So, I am going to share a new project every day for the month of November to get y'all (and myself) into the spirit of the holidays! I hope you enjoy the next thirty days with me! I would love to hear if you try any of the projects and how they turned out. <3 Erika


A collection of Handmade Advent Calendars


One of my favorite Christmas time family traditions growing up was the advent calendar. We always bought the chocolate piece filled ones from the store. And that is one of those family traditions I have wanted to pass on to my kids. Granted, I have not been good about it every year but when I saw some of these great ideas on Pinterest, I got motivated!


Stephanie Lynn has a great Pottery Barn inspired one filled with handmade ornaments for everyday. Check her post HERE.


A wrapped children's book for every night that you open and read together!


As a card maker, I really love this idea from Real Simple! Mostly because it would be so easy for me to make since I already have all the items needed!


Cute clothes pins on a simple board with small gifts and/or candies......


At The Life of Jennifer Dawn, you will find this advent calendar tutorial made with little tins that are filled with bible verses and manger pieces. 


This lovely and simple advent is filled with different family activities to do together. Check out the rest of the post by Lindsay at passionate homemaking


And, finally, the calendar we are going to make for this year! I love this idea by Erlend at Morning Creativity. I have been saving up our toilet paper rolls for a while now and I think the pile up is starting to bug my hubby. : / I am going to use red and green tissue paper to cover the ends. I think that will look more festive and be more fun for the kids. (But mostly because I have a BUNCH of it from over the years!) And, to go inside each day, along with the small prizes, I am going to put in a bible verse to read with the kids.


Here is the list of bible verses I am going to go by that I found on
Sassy Sawdust by Kim. 

What do you do for Advent? I would love to hear about your traditions! If you stop by an of the sites listed above, let them know you heard about them from Erika at MishMashedMe. Thanks!
You can find all these pins and more on my Pinterest board: 


Tomorrow: Homemade Marshmallows

Thursday, November 14, 2013

30 Days of D.I.Y. Gifts and Decor: Our Thank 'Fall' Mantel

Welcome to day 13 of


Hi All! Now that Halloween is over, I am switching my focus onto the up-coming holidays that will be filled with family and friends, love and laughter, giving and receiving! For me, some of the best memories and gifts have been what is handmade and from the heart. And, I love giving and receiving handmade and locally crafted gifts. So, I am going to share a new project every day for the month of November to get y'all (and myself) into the spirit of the holidays! I hope you enjoy the next thirty days with me! I would love to hear if you try any of the projects and how they turned out. <3 Erika


Our Thank 'Fall' Mantel


This year for our Fall mantel, I thought it would be fun to do an Autumn-themed collage with the kids. We went to the dollar store and bought a foam poster board and some glue sticks. Then we stopped by the thrift store and bought some old magazines that were all published during the fall months. The kids and I sat down and all flipped through the magazines, tearing out the pages to put on our board. The kids had fun gluing the pages to the board. At the center, I put together this message, "Thank Fall for home, where life and love happens." Our handmade picture sits in-between the kids' pumpkins that we grew in our garden. And I filled my glass candle holders with leaves from our tree. Trimmed it off with beaded garland that I bought at a craft store's after-Christmas clearance. All in all I think our Thank 'Fall' mantel turned out quite nice and all for only a couple dollars and time with the kids. Do you like to make collages with your kids?  


Next: Scarves with a Purpose


Tuesday, November 12, 2013

30 Days of D.I.Y. Gifts and Decor: Send a {Thankful} Hug

Welcome to day 12 of 


Hi All! Now that Halloween is over, I am switching my focus onto the up-coming holidays that will be filled with family and friends, love and laughter, giving and receiving! For me, some of the best memories and gifts have been what is handmade and from the heart. And, I love giving and receiving handmade and locally crafted gifts. So, I am going to share a new project every day for the month of November to get y'all (and myself) into the spirit of the holidays! I hope you enjoy the next thirty days with me! I would love to hear if you try any of the projects and how they turned out. <3 Erika


Send a Hug from Bettijo at Paging Supermom!


Call me old-fashioned but I think we all should make sending handwritten letters and cards in the 'snail' mail more important. The joy it brings to see an envelope in a mail box with your name on it just can not be compared to email or anything else. Especially for a child!
And as the holiday of being thankful for the blessings in our lives approaches, how can we forget our loved ones that are not close by? I think this idea of sending a hug in the mail to those loved ones is great! To make it even more special, have each child write why they are thankful for and what they love about the recipient(s). 

Have you sent a hug before? Or received one?
To learn more about how you can send one, check out the full post at Paging Supermom!
You can also find it on my Pinterest board, Gift Ideas-Hand made or Hand picked


Tomorrow: Our Thank 'Fall' Mantel 

Monday, November 11, 2013

30 Days of D.I.Y. Gifts and Decor: Preserved Fall Leaves for Thanksgiving Name Cards

Welcome to day 10 of 


Hi All! Now that Halloween is over, I am switching my focus onto the up-coming holidays that will be filled with family and friends, love and laughter, giving and receiving! For me, some of the best memories and gifts have been what is handmade and from the heart. And, I love giving and receiving handmade and locally crafted gifts. So, I am going to share a new project every day for the month of November to get y'all (and myself) into the spirit of the holidays! I hope you enjoy the next thirty days with me! I would love to hear if you try any of the projects and how they turned out. <3 Erika


Preserved Fall Leaves for Thanksgiving Name Cards 
from Julia 
at Blissfully Content


I have been wanting to do this every fall but never got around to learning how. Then Julia posted this and my heart smiled! Preserved Fall leaves are great for name cards but OH think of all the possibilities! And look at that precious handmade cloth napkin the leaf is resting on! You could make some for your own table or you could make a set as a hostess gift for your Thanksgiving hostess. How else would you use preserved fall leaves in your Autumn decorating? 

Check out Julia's Preserving Fall Leaves tutorial post for the step-by-step instructions that are easy enough for the little ones to help make.
For a tutorial on making those beautiful cloth napkins, 
check out Julia's post HERE
You can also find this on my Pinterest board: Falling for Autumn.


Tomorrow: D.I.Y. Wood Pencil Holder


Saturday, November 9, 2013

30 Days of D.I.Y. Gifts and Decor: Fall Table Setting

Welcome to day 9 of


Hi All! Now that Halloween is over, I am switching my focus onto the up-coming holidays that will be filled with family and friends, love and laughter, giving and receiving! For me, some of the best memories and gifts have been what is handmade and from the heart. And, I love giving and receiving handmade and locally crafted gifts. So, I am going to share a new project every day for the month of November to get y'all (and myself) into the spirit of the holidays! I hope you enjoy the next thirty days with me! I would love to hear if you try any of the projects and how they turned out. <3 Erika


Fall Table Setting with Robin at All Things Heart & Home


When I host a party my theory is throw one you would like to attend. One of the best ways to set a mood for a dinner party is a well set table. And that doesn't have to be expensive to do! Robin shows how to put together a lovely Fall table with natural elements. After reading this post, my mind wandered to what I may have laying around the house that I could use to set our Thanksgiving table. Beautiful maple leaves in all the fall colors, pine cones, berry sprigs, apples, plaid and velvet ribbons......
What do you have lying around?

Check out Robin's full post at 
All Things Heart & Home
You can also find it on my Pinterest board: Falling for Autumn.


Tomorrow: Preserved Fall Leaves for Thanksgiving Name Cards


Friday, November 8, 2013

30 Days of D.I.Y. Gifts and Decor: Pinecone Garland

Welcome to day 8 of


Hi All! Now that Halloween is over, I am switching my focus onto the up-coming holidays that will be filled with family and friends, love and laughter, giving and receiving! For me, some of the best memories and gifts have been what is handmade and from the heart. And, I love giving and receiving handmade and locally crafted gifts. So, I am going to share a new project every day for the month of November to get y'all (and myself) into the spirit of the holidays! I hope you enjoy the next thirty days with me! I would love to hear if you try any of the projects and how they turned out. <3 Erika


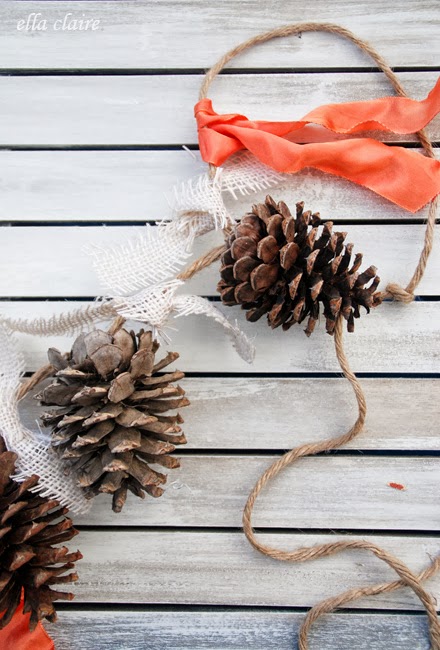
Pinecone Garland by Kristin at Ella Claire


I love all-natural holiday decorations! For one, you can find most of them outside, with your family on an adventure, and for free. And two, I love the simplicity and grace of them. They take me back to a simpler time; a less commercialized time, when the holidays were more about time with loved ones than the presents and such. I think that is why I am drawn to this D.I.Y. decor project. 

Go to Ella Claire and see the full tutorial post by Kristin. Great step-by-step instructions to have a beautiful, handmade Pinecone Garland that actually lays flat!
You can also find in on my Pinterest board: Falling for Autumn.


Tomorrow: Fall Table Setting


Thursday, November 7, 2013

30 Days of D.I.Y. Gifts and Decor: Pencil Christmas Cards

Welcome to Day 7 of


Hi All! Now that Halloween is over, I am switching my focus onto the up-coming holidays that will be filled with family and friends, love and laughter, giving and receiving! For me, some of the best memories and gifts have been what is handmade and from the heart. And, I love giving and receiving handmade and locally crafted gifts. So, I am going to share a new project every day for the month of November to get y'all (and myself) into the spirit of the holidays! I hope you enjoy the next thirty days with me! I would love to hear if you try any of the projects and how they turned out. <3 Erika


Pencil Christmas Cards


Last year, I found a bag full of new Christmas pencils at Goodwill. I wasn't sure at the time what we would do with them but it was a great price. $1.00! Then one day my son was doing a project with his stencils and I got an idea, Pencil Christmas Cards for his classmates! Christmas break was just around the corner and he wanted to do something for all his classmates. So, I went through all of my scrapbook papers and gathered the green paper. We set up a little work area and started crafting!


We set out the bag o' pencils......


We traced and cut out twenty-some Christmas trees.....
{This is great for your child to do! Hands-on learning.}


I cut two thin lines in the trees, one near the top and one near the bottom......


'Thread' the Christmas pencils through the slits and Voila! Pencil Christmas cards for my son's classmates for $1.00 and some scrapbook paper I had on hand! 


And when your helper is a handsome little man like mine is, the time invested is priceless! He was very excited to take his classmates their Christmas cards that he worked so hard on! And, to make it easy on him to carry them all to class to handout, we put them all in a gift bag with handles. :  ) 


What kid wouldn't love to make these!  


Tomorrow: Pinecone Garland


Wednesday, November 6, 2013

30 Days of D.I.Y. Gifts and Decor: Homemade Play Dough

Welcome to Day 6 of


Hi All! Now that Halloween is over, I am switching my focus onto the up-coming holidays that will be filled with family and friends, love and laughter, giving and receiving! For me, some of the best memories and gifts have been what is handmade and from the heart. And, I love giving and receiving handmade and locally crafted gifts. So, I am going to share a new project every day for the month of November to get y'all (and myself) into the spirit of the holidays! I hope you enjoy the next thirty days with me! I would love to hear if you try any of the projects and how they turned out. <3 Erika


Homemade Play Dough


This has become one of my favorite things to make for the kids.
 One - because it is SO easy! And Two - because I (almost) always have the ingredients on hand. If I don't, they are very inexpensive at my grocery store's bulk bin section. This also makes a great gift for all those birthday parties the kids get invited to. You can personalize the play dough by coloring it the giftee's favorite color. And with the money you save by making it yourself, you can add fun play dough tools with it! I have a friend that used this recipe to make up multiple colors and divided it out in small containers as a take-home gift for attendee's of her son's birthday party. Love that idea! I hope you enjoy making this quick and easy gift, whether you make it for your own kids or as a gift for some one else!


Step 1: Combine all ingredients in a saucepan over medium heat.


Step 2: Stir constantly for 3 to 5 minutes.


Step 3: Mixture will form a ball. I added in the coloring while I was stirring instead of at the beginning so the color wasn't quite dispersed all the way at this point. Ooops!


Step 4: Remove from pan and let cool in a vented container. I use a recycled lunch meat container that has been thoroughly washed. I have found them to be the perfect size for one ball of dough. I place the lid side ways on top of the container so moisture doesn't build up while the play dough is cooling. 


Step 5: When cool enough, knead until smooth. Keeps well and for a good while in an airtight container. My daughter being impatient and playing with the dough while I attempt to take pictures! 


Homemade Play Dough Recipe
Yield: About 2 cups   
1 cup flour
1 cup salt
1 tbsp cream of tartar
1 tbsp oil
1 cup water
Food coloring
1/4 tsp peppermint or vanilla extract

Combine all ingredients in a saucepan over medium heat. Stir constantly for 3-5 minutes. Mixture will form a ball. When cool, knead until smooth. Keeps well in an airtight container. 


Tomorrow: Pencil Christmas Cards 


Monday, November 4, 2013

30 Days of D.I.Y. Gifts and Decor: Glitter Falling Leaves Garland

Welcome to Day 4 of


Hi All! Now that Halloween is over, I am switching my focus onto the up-coming holidays that will be filled with family and friends, love and laughter, giving and receiving! For me, some of the best memories and gifts have been what is handmade and from the heart. And, I love giving and receiving handmade and locally crafted gifts. So, I am going to share a new project every day for the month of November to get y'all (and myself) into the spirit of the holidays! I hope you enjoy the next thirty days with me! I would love to hear if you try any of the projects and how they turned out. <3 Erika


Glitter Falling Leaves Garland by Sarah and Emily of Boxwood Clippings


A couple of my favorite things make up this lovely fall decoration: Glitter and the colors of Autumn! This project is easy enough you could include the kids too. I bought my package of 50 fake leaves at the Dollar Store and have a coupon for the craft store to purchase some glitter. I am going to fully enjoy making this decoration and I hope you do too! 
Check out the full project, with instructions, at 6th Street Design SchoolThis project originates with Sarah and Emily of the blog, Boxwood ClippingsYou can also find it on my Pinterest board, Falling for Autumn


Tomorrow: {Everything} in a Jar